Straight from my mom’s spiral notebook of her best recipes, this one is my absolute favorite cookie recipe. Made every single Christmas since I was a child, and occasionally throughout the year, these from-scratch sugar cookies are soft, fluffy, and will quickly have everyone gushing about them! Frosting recipe included.
Prep time: 15 minutes
Chill time: 2 hours
Bake time: 45 minutes
Frost time: 1-2 hours
Total time: A lot. But don’t be intimidated, they’re worth it. I recommend baking one day, and frosting and decorating another.

- 1 cup room temperature shortening (or one full block)
- 2 cups sugar
- 2 eggs
- 1 teaspoon vanilla
- 1/2 teaspoon baking soda
- 1-1/2 teaspoons baking powder
- 1 teaspoon salt
- 1 cup buttermilk (or whole or 2% works too)
- 5-6 cups flour
- Cookie cutters
Frosting:
- 1 cup powdered sugar, or more
- 1-2 Tablespoons milk, or more
- 1 teaspoon almond extract
- Dollop of shortening
- Sprinkles for decorating

- Cream together shortening, sugar, eggs, and vanilla.
- Add baking soda, baking powder, and salt and mix well.
- Add flour one cup at a time, alternating with the buttermilk, mixing well. Start with 5 cups and add a little at a time up to 6 cups if the dough is too runny or sticky.
- Chill dough for 2 hours, up to overnight.
- Preheat oven to 350 degrees Fahrenheit.
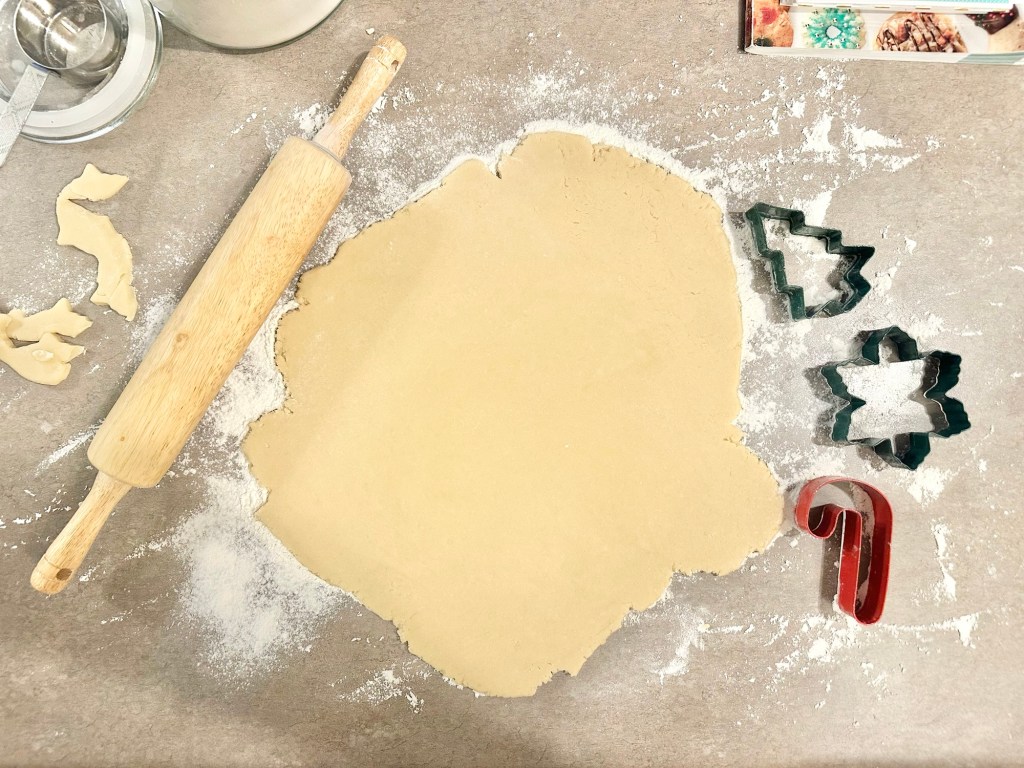
- Cut or tear your dough in half.
- Using one half at a time, roll out dough on a floured surface to about 1/2 inch thickness.
- Dipping your cookie cutters in flour each time, cut out shapes from dough using cookie cutters and place on ungreased cookie sheets, spacing apart about 1-2 inches.
- Bake for 5-6 minutes (or slightly longer, depending on your oven).
- Cool for 2 minutes on cookie sheet before removing to wire rack to cool completely.
Frosting:
- Mix all ingredients together in a bowl until frosting is thick enough to peak, but thin enough to spread easily. Add more milk to thin out or more powdered sugar to thicken.
- Spread carefully on fully cooled cookies and add sprinkles or edible decor immediately.
- Dry cookies completely before storing in airtight container. Layer cookies between parchment paper to prevent sticking.

- You don’t need to use buttermilk, but I do find they are fluffier. I actually grew up making them with 2% milk and they turn out either way.
- It is very important that you chill the dough for at least 2 hours. If you don’t, it will be harder to handle and much stickier, making cut-outs very difficult. For clean lines and easy-to handle-shapes, chill the dough.
- It is very important to flour your surface before rolling out your dough. This prevents the dough and the cut-outs from sticking. I also highly recommend flouring your rolling pin (you do this by putting your hand in flour and running it up and down your rolling pin). If you find your dough is especially sticky even after chilling, sprinkle some flour on top of your dough AND your rolling pin to prevent the rolling pin from ripping your dough up.
- I also recommend you have a little pile of flour to dip your cookie cutters in each time. This also helps with clean lines and prevents sticking.
- When baking, try and place similar sized cut-out shapes on the same cookie sheet. This prevents under baking and over baking the cookies. For example, during the holidays, I usually try and do a whole tray of trees, then snowflakes, then candy canes, etc. If you are only using one shape, this advice wouldn’t apply.
- The bake time is more of a guideline. Occasionally I have to do 6-1/2 to 7 minutes if my dough was rolled out a little thick. However, always start with 5 and go up in 30-60 second increments at a time to prevent over baking or burning.
- When frosting, use care. These cookies are delicate and they will break if you aren’t careful. This is why the frosting can’t be too thick. It shouldn’t be runny, but you shouldn’t have to put your back into it to stir either.
- These cookies are best with a simple sugar sprinkle. You can get a variety of colors at just about any grocery store in the baking aisle. Because they’re a delicate cookie, using heavy decor (chocolate chips, candies, etc.) can be tricky. However, I definitely encourage you to be creative and really make them your own. That’s the fun of it, after all.
- Do not feel like you have to frost them the same day you bake them. I have made these many times on one day and come back to them a day or two later to frost and decorate and I assure you, as long as you store the cookies in an airtight container, the quality won’t be compromised.
I went back and forth for a long time about sharing this recipe because it’s such a special one for me, being that I grew up with it. I have precious memories of holiday baking with my mom and spending hours at night decorating these cookies for our friends and family. Eventually my little brother joined us too when he was old enough to help.
We would get pretty detailed with our decorating, always pushing our creativity to see what we could come up with, but the true joy was in sharing the experience–the three of us talking, laughing, exchanging memories.
That’s what I hope you get from this recipe.
Don’t get me wrong, they are truly delicious cookies. A labor of love too, because you do need some time to get them done from start to finish, which is why I usually bake one day, frost and decorate the next.
But what I really hope for you is that you spend time with someone you love making these together. My mom and I made them together even into my adult years. Now I get to make them with my daughter, and my husband even helps us frost and decorate.
This is what handed-down recipes are all about–bringing people together and creating lasting memories for years to come. And it’s why I wanted to share it with all of you. So you can do the same.
From my heart to yours, I truly hope you love this recipe as much as I do.
Until next time,


Leave a comment