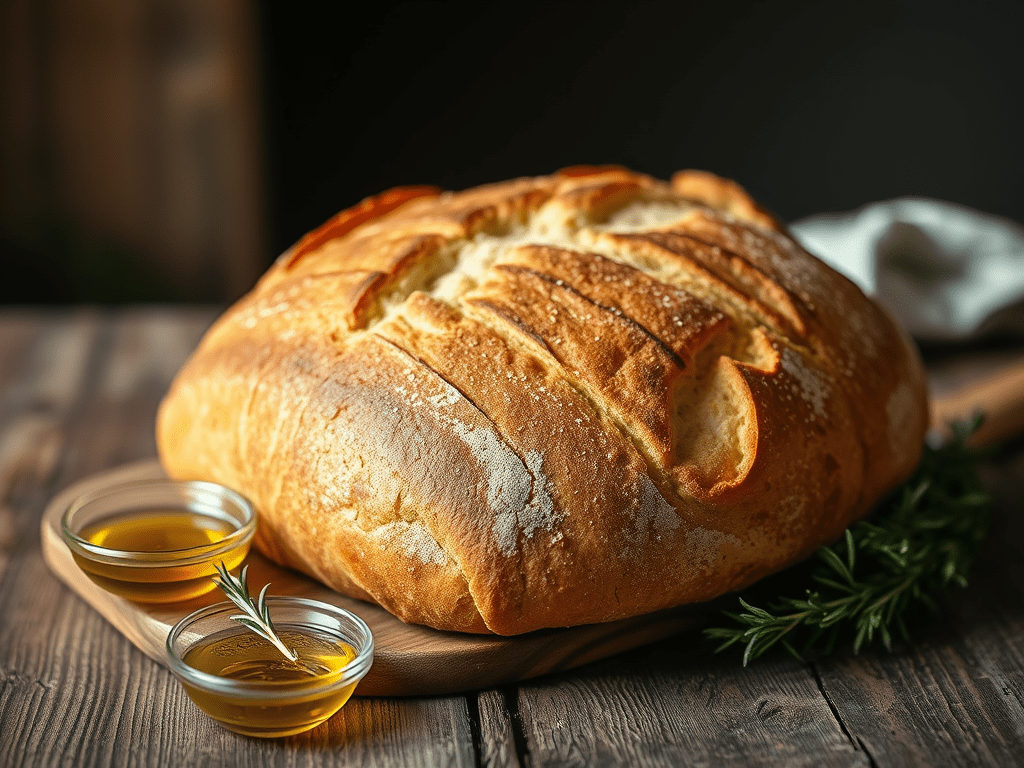
This simple and delicious homemade bread recipe is so easy to make! Perfect with soups, stews, or for dipping.
Prep time: 2ish hours, broken up, including rise time
Bake time: 25-30 minutes
Total time: 2-1/2 hours max.
Makes 1 loaf

- 3-1/2 cups bread flour
- 1-1/2 teaspoons salt
- 1 teaspoon sugar
- 1 packet (2-1/4 teaspoons) active, dry yeast
- 1-1/4 cups warm water (about 110 degrees Fahrenheit)
- 2 Tablespoons olive oil
Optional:
- 1 Tablespoon rosemary, oregano, or your choice of herb as a mix-in

- Temp your water to make sure it is about 110 degrees Fahrenheit. This will ensure your yeast activates correctly.
- In a large mixing bowl, add warm water, sugar, and yeast. Let it sit for about five minutes until it turns frothy.
- Add flour, salt, and olive oil to the yeast mixture and stir until a rough dough forms.
- On a floured surface, turn out your dough and knead for 8-10 minutes until dough is elastic and smooth. Setting a timer is a big help in knowing just how long to knead it. If you are adding herbs, add them now and knead them in.
- Place your dough in a greased bowl (I use olive oil cooking spray), cover it with a clean kitchen towel, and let it rise in a warm place for 1 to 1-1/2 hours, or until it is about doubled in size.
- Punch down your risen dough and shape it into a round loaf. Place your loaf on a piece of parchment paper (NOT wax paper!).
- Cover with a kitchen towel and let rise another 30 minutes.
- Preheat your oven to 450 degrees Fahrenheit. Place a baking stone or inverted (upside down) baking sheet in the oven to heat up.
- Once your 30 minutes is up, using a sharp knife, put a few slashes on the top of your loaf and carefully transfer it with the parchment paper to the oven and place on the hot baking stone or baking sheet.
- Bake 25-30 minutes until the bread is golden brown on top and the bottom of the loaf sounds kind of hollow when tapped.
- Remove and let cool on a wire rack before slicing or serving.

- This will be a crusty type of bread once baked. If you want a softer crust, add some butter to the top of the loaf immediately after baking before it cools.
- There are some people who will say that temping your water for yeast doesn’t matter. I personally have no idea if it matters or not, but I have temped my water to about 110 degrees Fahrenheit and successfully made this recipe, so I’m partial to doing it that way because I know it works.
- You can use all-purpose flour as well if you do not have bread flour. I just find bread flour to be more even and it bakes better.
I always thought baking bread was more difficult, but I was basing this off of one experience of making bread that was unsuccessful. I’m thrilled that I decided to try this again because I couldn’t be happier with how it turns out every time and how EASY it is to make!
With fall just around the corner, this is a perfect recipe to try out and play with to have as a partner to our favorite comfort foods, like lemon chicken noodle soup, turkey chili, baked ziti, ham and bean soup, or Zuppa (or maybe those are just my favs! hehe). It’s also great for cheesy dips like queso, pizza dip, or other warm dips as an alternative to chips or crackers.
While I have never made it as a sandwich bread, I have sliced a hunk off and added peanut butter for a quick snack, which was also yummy.
However you decide to use your loaf, I hope you enjoy it as much as me and my family!
Until next time,


Leave a comment